How to root any android device in the easiest way (without computer)

How to root any android device in the easiest way (without computer)


Rooting process is now not so much difficult as before and without taking high risk of bricking your device you can root your phone very easily.After reading this article you will be able to root any android phone very easily. About all types of mobiles like Samsung,Lg,Motorola,Sony, Walton,Symphony and much more can be root with this method.

Before starting we should know what root actually means and what are the advantages and disadvantages of rooting.

What is Root?

Android rooting, also known as “root your android device”, is the process of allowing users of Android smartphones, tablets, and other devices to gain root access to your device.
It means users can access with superuser permissions to their android devices. Rooting is often performed with the goal of overcoming limitations that carriers and hardware manufacturers put on some devices.

So, after to root an Android device, users have the ability to alter or replace system applications and settings, run specialized apps that require administrator-level permissions, or perform other operations that are otherwise inaccessible to a normal Android user. On Android, rooting can let many users the complete removal and replacement of the device’s operating system version, usually with a more recent release of its current operating system (known as custom ROM). 

 Root your Android ( Step by Step guide)

1. Download the Framaroot APK from Here or here.

2. If you download it on your computer,copy Framaroot APK in your sd card using data cable.
3. Head to Menu>>Settings>>Security on your device and enable the Unknown sources option.
4. Open the File Manager app on your device and install the app you copied earlier to your device.

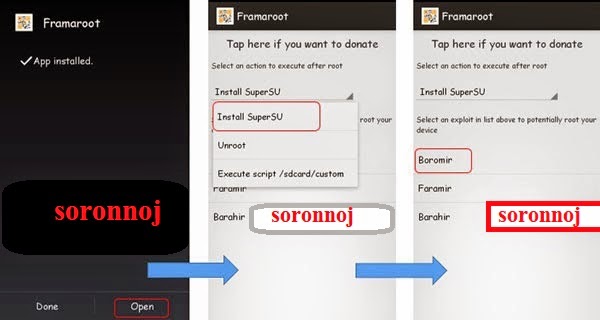
5. Once the app’s been installed, launch it from your App Drawer.
6. Select Install SuperSU from the first dropdown menu.
7.You will now see few options available (exploits) on the screen just click on the first one.
If you get a message that says “Failed … Try another exploit if available” then repeat choosing another exploit.
8.If you get a message that says Success … Superuser and su binary installed, You have to reboot your device.

You have successfully rooted your phone, now download Rootchecker from Playstore to confirm it.


Advantages of Rooting

First and foremost, rooting allows the customizations since like it allows the installation of Custom ROMs in the phone. Allows you to convert file systems from the laggy RFS to the speedy EXT4, Allows you to remove the system apps which come by default with the phone, Allows you to apply lots of other customizations

Disadvantages of Rooting

The only disadvantage of rooting is that it voids the warranty but it can be reclaimed if you up.

Everything about Android


What is Android?


Android is a mobile operating system (OS) based on the Linux kernel and currently developed by Google. With a user interfacebased on direct manipulation, Android is designed primarily for touchscreen mobile devices such as smartphones and tablet computers, with specialized user interfaces for televisions (Android TV), cars (Android Auto), and wrist watches (Android Wear). The OS uses touch inputs that loosely correspond to real-world actions, like swiping, tapping, pinching, and reverse pinching to manipulate on-screen objects, and a virtual keyboard. Despite being primarily designed for touchscreen input, it also has been used in game consoles, digital cameras, regular PCs and other electronics. (Wikipedia.com)

Today I will discussed different terms related to Android. 

Root


There are some files and systems that one cannot access because they are blocked by the manufacturer for our betterment. It's only for that if these files are changed this can affect whole system to work.So, only experienced can change these files or systems. But sometimes to we need the root access to enjoy certain facilities which are not possible without rooting. So, by gaining root access you can change,edit even delete the files.The root access gives you total control over the systems.

Bootloaders

Every Android phone has a bootloader that instructs the operating system kernel to boot normally. But you need to understand one thing here that as Android OS is an open source OS and is available on a variety of different hardware, every manufacturer has their own version of bootloader specific for the hardware present in it’s environment. We also saw couple of weeks back that Motorola packaged an “eFuse” command in their Android phones, which could brick (permanently turn off) your device in case you tried to flash a Custom ROM.
ROMs


You may have heard of people loading custom  ROMs on their Android devices. A “ROM” is the operating system software that runs your Droid. It is stored in the “Read Only Memory” portion of the hardware on the Android smartphones and/or tablet. All Android devices come with a stock ROM installed by the manufacturer. But, if you root your device, you gain the ability to install custom ROMs that will completely change the look and feel of the software. This is one of the major reasons that people choose to root their Droids.

Kernel 


 Unlike a ROM the Kernel does not alter the look and feel of your phone, but is a “deeper” line of code that rests beneath the surface, so to speak. It tells the software how to interact with the hardware. A custom kernel is a kernel that developers have added code to, in order to create all sorts of new options and abilities. They might add code to make the phone’s processor run at a higher speed, or make the battery draw less power when the phone is in “idle” mode. Kernels are like the soul of the software. They can be flashed in the custom recovery and the files are usually called Tar Images or Zimages.

Nandroid Backup

Nandroid, sometimes written as NANDroid, is a portmanteau for NAND flash memory, the type of permanent storage memory that your device uses, and Android. A Nandroid backup is a de-facto (by the hacking community) standard directory structure for backing up a perfect mirror image of your Android device. By doing this backup, you can save literally everything, from your own personal data to the system files.Nandroid backup is very much important before rooting because it can save your set from being totally unusable if it bricks during installing custom ROMs

Brick
A brick is when your phone won’t recover from a bad rooting/flashing process. Your device becomes unresponsive and unable to be restored…essentially making it a “brick” or a very expensive paperweight. Bricking your phone usually happens when you do not follow instructions carefully or if a device does not allow for root. Bricking your phone is a real possibility and risk in rooting and modding your phone, but it is very rare to occur, and most unlikely to occur if you simply follow the instructions.
Superuser (SU)
Superuser means getting the power of root access. That means your are now eligible for change,modify,even delete the files which were blocked by manufacturer. 


                                                                                       To be continued...............

How to root and unroot Symphony Mobiles


Today I am writing about how to root Symphony Mobiles. This root Process is  tasted on Symphony xplorer W68  and works fine.

Process : This is the easiest way to rooting an android device. You do not need Computer , Data Cable and Any other Application for the Process.
This is very simple process and you don't have to have much experience to root. Just follow the instructions carefully. The main advantage of this process is there is no risk of bricking your device.

Step by step guide:

  1. Download the framaroot 1.9.1.apk from the link below Download
  2. Install the framaroot 1.9.1.apk on your phone.
  3. Go to settings ==> developer option ==> USB debugging. Click on the check box.
  4. Open the framaroot apps and Select install super SU4. 
  5. Now Click on bromir.
  6. You will get a success message 
  7. Now reboot the device.
That's all. You will see the super SU apps in application list. Now the Android device is rooted.

N.B: If your framaroot crashes on first try, then try again.

I have tasted this trick on Symphony xplorer W72 successfully. If you want to check, install "root checker apps" from play store.

Custom ROMs and Advantages of using

If you are using an Android device,you must have heard about Custom rom. Though many of us don't know what it actually means. Today I will clear the term for you. 

When we buy any android device it comes with stock rom.
A stock ROM is the version of the phone's operating system that comes with your phone when you buy it.
A custom ROM is basically a different operating system for your android device. Unlike the pre-installed firmware that is provided by the manufacturer, such as Samsung Touchwiz or HTC Sense, custom ROMs provide an almost pure Android experience much like that you’d find on Google’s Nexus devices. Custom ROMS are also enriched with many useful extra features and customization options that affect the behavior of the system. Thus, the user gets more control over their device than it would ever be possible with the standard software from the manufacturer. In addition, custom ROMs are also a good way to install a more recent version of Android on your device.

The advantages of Custom ROMS 

Normally we have to wait for new android distribution or new features from the manufacturer of our devices but custom ROM developers make it published for you within a very short time. So, with custom ROM you can talk the taste of newly arrived android version.

After rooting your phone you can install any custom ROM build for your device and you can also return to your stock ROM which was provided by your manufacturer. 

Why you use Custom ROMs

Besides a lot of advantages of custom ROM, it is faster than Stock Rom given by carrier. Why you will use Custom ROMs is described below: 

1. Free from useless apps: Developers ripped out useless apps that comes with Stock ROM.
2. Optimized Kernel: For example, an undervolted kernel can provide a much better battery life than the stock one. 
3. Upgrade to latest android is possible: You can take the taste of latest android version which has not released for your device yet.
4. Ability to move installed apps to SD card: About all today's Custom ROMs have the function to move installed apps to SD card which is not possible in case of stock ROM. 


Facts you should know before installing Custom ROMs:

Although  Custom ROMs have a lot of advantages but a tiny mistake can make your device brick. So, before proceeding you should know some facts which can save your device from being bricked.

  • Always try to find such a Custom ROM which is tested and has positive feedback. You can take opinion from those who have used the ROM. 
  • Take a complete backup of your device so that you can return to your previous stage if something unexpected is occurred during installation of Custom ROM. For backing up your device you can see our article about " How to back up and restore android devices"  
  • You should remember that Custom ROMs void warranty. So, to get your warranty back you must be return to stock ROM. 

Some popular Custom ROMs

1. CyanogenMod

CyanogenMod is the most stable and popular Android custom ROM. It comes with 12+ awesome themes, lots of visual styles and additional features. CyanogenMod is so much popular custom ROM that it is trying to turn into more regular business in competition to Android stock ROM. The ROM comes with one-click installer setup, so you don’t need to do much technical stuff. Most of the things are similar to stock ROM however it has better camera app and file manager.
If you want to customize your Android the exact way you want, then CyanogenMod is best for you.
12-Awesome-CyanogenMod-7-Themes

2. Panaroid Android

Do you love Flat UI, the new trend in graphic designing? If yes, then Panaroid Android is a custom ROM that will provide this cool Flat UI interface to your Android.  It comes with similar tweaks as like CyanogenMod custom ROM but with a bonus feature of hybrid mode which allows you to scale on-screen elements to make them larger or smaller. For example, you can resize notification bar to not take on all of your phone’s screen while showing notifications.
Panaroid Android custom ROM allows you to change color schemes in your settings menu to match your phone’s outfit. Moreover, it also supports multi-window feature (which is in beta, however) which put it among top 3 best Android custom ROMs.
paranoid android-580-90

3. AOKP custom ROM

AOKP stands for Android Open Kang Project which is an oh-so-clever name on Android Open Source Project. This custom ROM aims to be as simple as possible . While all ROM settings are hidden in “ROM Control” inside Settings menu, the rest of the operating system stays pretty faithful to stock Android.
They claims that when you enters inside the operating system, AOKP provides as many options as CyanogenMod custom ROM. The centralized approach is certainly smart to easily enjoy AOKP custom ROM new options.
AOKP-580-90


If you have found this article helpful for you then please leave a comment on comment box. 


You can check Collection of Custom ROMs


How to install CWM or Clockworkmod in your Android in easy way


We have already know about  How to root any android device in the easiest way (without computer) .  Today we will see how to install Clockworkmod known as CWM in the easiest way. That’s why today I will show you how to install a custom recovery image – CWM recovery – on your Android powered handsets (the step by step guide will work for both tablets and smartphones). So, if you are looking forward in tweaking your phone, do read and apply the following lines.
First of all, you should ask yourselves: do I really need to install a custom recovery image on my Android device? In order to answer to that question, first read the things mentioned during the following list:
  • A custom recovery image can be installed only on a rooted handset. Therefore, before applying this tutorial, you need to learn How to root any android device in the easiest way (without computer)
  • The warranty of your handset will be voided – because you need to unchain the OS of your phone (as you know the root operation isn’t official and that’s happening when you are applying unofficial procedures).
  • Your device is already featuring a recovery image; the stock recovery that comes pre installed on all the Android devices isn’t useful though especially if you are looking into tweaking your handset.
  • The custom recovery image can be used when trying to flash .zip files from the SD card (such as custom ROMs), when trying to perform maintenance, optimization, customization, backup, restoration, hard reset and a lot more operations that usually aren’t available.
So, you should learn how to install a custom recovery only if you agree with the up mentioned aspects. Furthermore, now you should be asking yourselves, why CWM recovery? Well, here the answer is simple: CWM recovery, or ClockworkMod Recovery, is one of the most popular custom recovery available for the Android system. The tool is being available on Google Play (the official variant of the app only) and the same is suitable with almost all the Android powered devices available on the market. Furthermore, CWM recovery comes with great features and capabilities and will smoothly run on your handset.
Therefore, if you had decided to install CWM recovery on your smartphone / tablet, then begin the flashing operation with the preparation tasks. In this way you will be able to avoid the unpleasant situations and also your phone will be prepared for the installation procedure.
  • First, you need to know that not all the devices are being supported by the official CWM recovery tool. So, before installing the same, make sure to check if your device is included on the official CWM recovery support list.
  • Then, also before starting the flashing operation, backup the data, personal info, saves and accounts from your handset – the data might get corrupted and you are risking in losing all of your personal info.
  • Remember to root your phone first.
  • If you are applying the unnoficial CWM recovery, then you will have to use a computer, your device and its USB cable – you will have to download a suitable version of CWM recovery that can be applied on your phone / tablet.
  • Don’t complete things by yourselves without consulting my directions as you can end up in bricking your device.

How to Install CWM Recovery on any Android device

Method 1:

  1. The first thing to do is to download the CWM recovery tool.
  2. So, take your device and go here.
  3. Get the app and install the same.
  4. Open CWM recovery.
  5. From the pop-up menu select “flash CWM recovery”.
  6. Use the recovery menu for performing the operation you need.
  7. You can access CWM recovery in a different way too; all you have to do is to turn off your phone. Then, you need to reboot by pressing (usually, but on some devices the buttons that need to be pressed are different) Power, Volume Up and Home buttons at the same time.
  8. That’s it; you can reboot into Android by selecting “reboot system now”.


Method 2: Installing Clockworkmod using Rom manager .

  • Step 1: Install ROM Manager on your Android device and Run it .
  • Step 2: Select Recovery setup from the ROM manager app .
how to flash clockworkmod recovery android rom manager How to Install ClockworkMod Recovery on a Rooted Android Phone [ Easy method ]
  • Step 3: Under Install or update recovery , tap on ClockworkMod recovery .
  • Step 4: Wait a few seconds for the app to identify your Phone’s make and model . If the app correctly displays your phone’s model then tap on it . Although the phone will recommend you to connect to a WiFi network , a 3G data connection works perfectly , as the Clockworkmod recovery is around 7 to 8 MB is size for all Android Phones . Click ok to everything to proceed further .
rom manager detecting phone model How to Install ClockworkMod Recovery on a Rooted Android Phone [ Easy method ]
  • Step 5: Tap on Flash ClockworkMod Recovery . The app will now begin to download the Clockworkmod recovery . Wait for a few seconds until the download completes . After the ClockworkMod recovery is downloaded , the app will automatically install it on your phone .
Rom manager downloading clockworkmod recovery How to Install ClockworkMod Recovery on a Rooted Android Phone [ Easy method ]
  • Step 6: To check if the ClockworkMod recovery is installed on your phone , return to Rom Manager’s home menu and tap on Reboot into Recovery . Your phone will now reboot and enter the ClockworkMod recovery .
That’s it , now your Android phone has been successfully flashed with the latest ClockworkMod recovery . go ahead and install a custom Android ROM and enjoy your phone .

Create a Drop Down Menu In Blogger


Why do you run after scripts such as jquery while you can use simple CSS and HTML to create beautiful drop down menus for your blog.  now you need to learn how to create a drop down menu in a navigation. I am sharing a simple code here that can be fully customize to make your preferred changes. So lets get to work!

Resume Mediafire Downloads Using IDM


There is hardly anyone who doesn't download from mediafire having internet connection. Numerous number of files are downloaded daily from mediafire. Usually mediafire gives resume function to its downloads as the maximum file size allowed is 200 MB for free user. However sometimes the resume will only last for a few minutes, and the download will not resume if you sent request to resume downloads. Today I am gonna sharing how to resume Mediafire downloads.

How to load websites without images (Chrome tips)

If you have limited bandwidth or low internet connection it takes much time to load a webpage which has a lot of images or few images but with high resolution.But there are some sites which images are important to you. That's why you can not block images for all sites. Today, We will see how to block images for any website .


Follow the steps:

How to disable or enable USB Ports

How often you have witnessed blocked Pen drive or USB drive access in your work place or college or school? I believe many times; in fact every time you try to use the USB drive, you are not allowed, simply because the administrator has disabled USB drive detection on your PC. Again, how often has your data been stolen because someone connected an unauthorized USB to your computer and copied your files?  Well, you don’t need to worry because the solution to disable or enable USB Ports is pretty simple.

Restrict access to USB drives

There are three ways an administrator can prevent using of USB Drives.

They are:
  1. Altering registry values for USB Mass Storage Devices.
  2. Disabling USB Ports from Device Manager.
  3. By Un-installing the USB Mass Storage Drivers.
Lets us look at how we can fix these problems and enable USB on PC.

1. Disable or Enable USB Mass Storage Devices using Registry.

If the administrator is smart then he would definitely do this to ensure a tight blockade. He would alter the settings through regedit command on run console. Now how do you unlock it ? You have to go right into where the administrator has been. Here is how.
  1. Go to Start > Run , type “regedit” and press enter to open the registry editor
  2. Navigate to the following key
HKEY_LOCAL_MACHINE\SYSTEM\CurrentControlSet\Services\USBSTOR
In the right pane, select Start and change the value to 3. (The value 4 will disable USB Storage). Click OK. This will re-enable USB Ports and allow you to use USB or Pen drives.


2. Disabling USB Ports from Device Manager.

If you still don’t find your USB drive working, you may have to look into the Device Manager. The Administrator could have possibly disabled the USB port here. Check out for any possibility in the Device Manager and enable the disabled port by right clicking on selected one and click Enable.


3. By un-installing the USB Mass Storage Drivers.

If the authorities are really worried about security in the school they would take the extreme step of un-installing the USB Mass Storage Drivers. To make things work, just install the device drivers. Here is how you do it.
As when you plug-in your USB drive, Windows will check for drivers, if not found Windows will prompt you to install the driver. This would definitely unlock the Pen drive at your School or office.

4. Use USB Drive Disabler /Enabler.

You can download and use a free tool USB Drive Disabler / Enabler which will allow you to easily enable or disable USB drives on your Windows computer.


Please let us know if you have any questions.

Optimize your Meta Description Tag

The Meta Description Tag (placed between the head and /head tags) is used by some search engines to create the snippets of text that you see right below the results on search queries. It does not carry any weight in the search algorithm of Google, but it does carry a certain weight for Yahoo and other smaller search engines so you should not neglect it altogether.


In order to optimize your Meta Description Tag you should make it dynamic, making sure that it will include the first few lines of text of every single page on your site. A very simple way to do this under the WordPress platform is to make the Description tag equal to the post excerpt, like the code below illustrates.
<meta name="description" content="<?php the_excerpt() ?>" />
Alternatively you can download a plugin called Head META Description. Just upload the plugin, activate it and insert the following line on your header:
<?php head_meta_desc(); ?>
The plugin will generate the Meta Description automatically, either by extracting the first words of your posts or by displaying the post excerpt (you can configure it).

Add Facebook like Box in Blogger Blog

 Dear friends,
Social networking sites like facebook, twitter, google plus etc are parts of blogging. And every site has a way to link with your blog site. However, the above sites provide custom follow or like boxes which help you in many extent. Like box help you to reach your blog to audience by providing them a way to keep in touch.It also helps to grow your traffic as traffic is one of the main objectives for a blogger.


When you start your Facebook page you ask your friends and family members to like it and after that it all depends upon the content you write. If people like your content they will voluntary like your Facebook page. But still you need to provide them with an easy method of doing this. Facebook like box allows your visitors to join you easily and they don't have to find you manually. Facebook developers have made this thing very easy to integrate a Facebook like box in to your Blog by adding a few lines of code in it. No let us take a look at the steps you need to follow.


Steps to add Facebook like Box


  • This process includes the editing of your Blog's template, so it is recommended to take a backup of your Blog. First click on the template from your Blogger Dashboard. Then click on Backup/Restore and download the template from the pop-up window.
  • Now that you have taken the backup, you are ready for the process. Visit the Facebook Developers.
  • You will see a window like the one shown below.


  • Customize the look and feel, height, width of your Like box from this window.
  • Uncheck the show stream if you don't want the latest posts with this widget.
  • Uncheck the header checkbox if you don't want to display "Find us on Facebook".
  • Once you are done with the customization, click on Get code. It would pop-up a window like the one shown below.


  • Click on Edit template from the Blogger dashboard. Copy the code 1 from the above window and paste it just after the <body> tag.
  • Now save the template and click the Layout button.
  • Click on add a gadget from your sidebar. Add HTML/JavaScript gadget and Paste the code 2 in it.
  • Now you are done. Save the arrangement and click on View Blog.

Printer and File Sharing

File and Printer Sharing is a Windows feature wherein all the computers in your network would be able to send communications to a computer or send print jobs to a printer.  All your computers should be part of the main network and the same Workgroup for File and Printer Sharing to work properly.
NOTE:  To view the network group your computers currently belong to, check the Workgroup by opening My Computer (XP) or Computer (Vista & Win 7) on the Start menu and clicking on Properties.
What you can do with this feature:

  • File Sharing – You can access a shared folder on computers that are joined to a Workgroup.  This allows easy sharing of files and folders across a local network.
  • Printer Sharing – Setting this up will require you to ensure that your regular printer is connected directly to a computer that is connected on the network; or if you have a network printer, it should be connected to a networking device such as a hub, switch or router.
NOTE:  The information on this article is provided as reference.  For proper File and Printer Sharing configuration instructions, contact Microsoft or refer to the Microsoft support site.


Sharing a printer in Windows 7
Step 1:
Go to the Start menu and select Devices and Printers.
 
Step 2:
Locate and double-click on the icon of the printer you would like to share.
 
Step 3:
Double-click Customize your printer.
 
Step 4:
On the next window that appears, perform the following:
Step 1:
Go to the Sharing tab.
Step 2:
Check the box next to the Share this printer option.
Step 3:
Enter a Share name for your printer.
Step 4:
Click OK at the bottom to confirm your settings.
 
You should now be able to browse and add your printer on the other computers within your network.
Sharing a printer in Windows Vista
Step 1:
Go to the Start menu and select Control Panel.
 
Step 2:
In the Control Panel window, select Printer under the Hardware and Sound category.
 
Step 3:
Locate and right-click on the icon of the printer that you would like to share then select Open from the menu.
 
Step 4:
In the window that appears, click Printer and select Sharing...
 
Step 5:
On the next window, perform the following:
Step 1:
Go to the Sharing tab.
Step 2:
Check the box next to the Share this printer option.
Step 3:
Enter a Share name: for your printer.
Step 4:
Click OK at the bottom to confirm your settings.
 
You should now be able to browse and add your printer on the other computers within your network.

Sharing a printer in Windows XP
Step 1:
Go to the Start menu, and select Printers and Faxes.
 
Step 2:
In the Printer and Faxes window, locate and double-click the icon of the printer you would like to share.
 
Step 3:
A new window will then appear.  Click Printer and select Sharing…
 
Step 4:
On the next window, perform the following:
Step 1:
Go to the Sharing tab.
Step 2:
Select the Share this printer option.
Step 3:
Enter a Share name: for your printer.
Step 4:
Click OK to confirm your settings.
 
You should now be able to browse and add your printer on the other computers within your network.


Sharing files or folders in Windows 7
Step 1:
Right-click any folder you would like to share and select Properties from the menu.
 
Step 2:
On the next window, go to the Sharing tab and click on the Share… button.
 
Step 3:
On the Choose people to share with window, perform the following:
Step 1:
Click on the drop-down arrow and select a user or group that you would like to share your folder with.
Step 2:
Click on the Add button to add the user.
Step 3:
Click Share at the bottom.
 
Step 4:
Click Done.
 
Your folder and files should now be accessible to the users or groups you specified.
Sharing files or folders in Windows Vista
Step 1:
Right-click a folder you would like to share, and select Share… from the menu.
Step 2:
On the next screen, perform the following:
Step 1:
Click on the drop-down arrow and select a user or group that you would like to share your folder with.
Step 2:
Click on the Add button to add the user.
Step 3:
Click Share at the bottom.
 
Step 3:
Click Done to confirm your settings.
 
Your folder and files should now be accessible to the users or groups you specified.
Sharing files or folders in Windows XP
Step 1:
Right-click on a folder you would like to share, and select Sharing and Security… from the menu.
 
Step 2:
In the next window, perform the following:
Step 1:
Go to the Sharing tab.
Step 2:
Select Share this folder.
Step 3:
Enter a Share name: for your folder.
Step 4:
Click OK at the bottom to confirm your settings.
 
You should now be able browse and access your shared folder from other computers within your network.


Troubleshooting Tips:
  • Before you proceed with enabling File and Printer sharing, make sure that your printer is able to print when directly connected to a computer.  This is to ensure that the printer is working properly.
  • If you are having problems when the printer is directly connected to your router, there is a possibility that your printer has a Static IP address and may be in conflict.  It is recommended to set the printer to DHCP so the router may assign a dynamic IP address for your printer.  You may refer to your printer’s manual or contact your printer’s technical support for assistance.
All Windows OS have a firewall that is enabled by default.  For example, a Windows XP computer has the Internet Connection Firewall (ICF) which may interfere when you are trying to configure File and Printer sharing.  For computers on the network that need to participate in file sharing, it is best to lower the level of firewall security or temporarily disable it.