HOW TO MAKE SINGLE OR ONE WORD NAME ON FACEBOOK


Want to produce an amazing and also eye-catching profile with one word Facebook name, you can very easily do it with these awesome tips provided below:
  • First login to your Facebook account which you want to change.
  • Now go to your browser network setting. There are lots of browsers but I will recommend you to use Firefox for this purpose. In Mozila Firefox go to Tools> Options > Advanced > Network > Settings. You will find out this option bar from the top of your browser.
  • Now select manual proxy and put “119.235.16.41″ in the proxy address and “8080″ in the port address. And make sure to check the box said, “use this proxy server for all protocols”. You should be logged in to your account before changing proxy. Because sometime you may can’t login to your account.  Please note that, this is not a specified proxy. You can use any others as you wish but the proxy should be Indonesian. You can get many proxies from here Indonesia Proxies. This is the main process to have a Facebook without last name. For more check out the screenshot from below:

         
  • Now change the language of your Facebook account to “Bahasa Indonesia”. For that click Gear Icon > Account Settings > Languages. After changing save the setting.


  • Now click on the Name setting from the account settings page. Then just remove the last name and save name with your password. Make you sure that, in this way you can only use the first name as your full name. So, if you want a different name from your full name, first change the first and last name and keep your selected name in the first name section. Now in this method, delete the last name and make one word Facebook name. At the last save and enjoy this feature of Facebook without last name.


Schedule Facebook Updates

Facebook, A major social networking site which has attracted almost all the Internet users and so much addictive that we always forget to have our snacks, finish our works etc.. So we always schedule ourselves to manage the time properly and hence finish our work completely !


The most important activity any Facebook user does is updating his/her Facebook status. In order to manage time you must also schedule yourself while using Facebook,  So placing a timer besides you and then staying on Facebook doesn’t work all the time. So I have found few online tools,applications and tricks to schedule your Facebook status update while you are busy working or sleeping icon wink 10 ways to schedule Facebook status updates .

LaterBro

With LaterBro you can schedule Facebook status updates, while simultaneously updating Twitter. The service is as bare bones as it gets, simply allowing you to schedule updates. The disadvantage to using LaterBro is that status updates are limited to 140 characters, even though Facebook status updates do allow you 420 characters per update. While you can’t add images to your updates, you can include links, and LaterBro has a native url shortener. Updates can be scheduled every fifteen minutes, and you can also schedule certain updates to be repeated on a daily, weekly, monthly or even yearly basis


All scheduled updates are visible in your account, and you can delete them before hand individually or in bulk.
The status updates on Facebook will feature a link to LaterBro.


Hootsuite

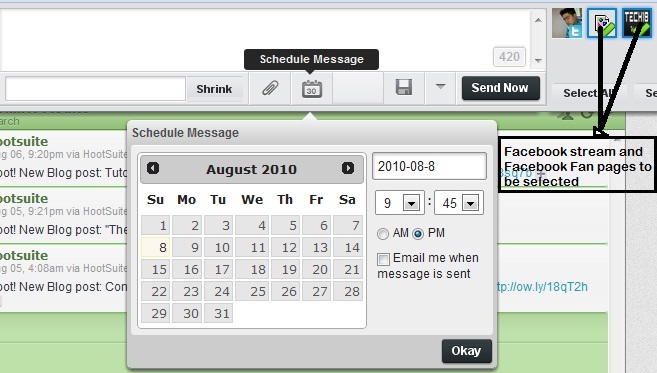
Hootsuite is a web based Twitter application, which is used to post tweets as well as Facebook status updates to your profile as well as the facebook fan pages. These updates can be scheduled easily and very quickly. Below is the screenshot of the Hootsuite application to make you understand its working.


Burn a CD/DVD without using any software

CD/DVD burning capability has been added to Windows Operating System since the release of Windows XP. However, the steps to burn CD/DVD on Windows Vista and Windows 7 are a bit different (and somewhat simpler) comparing to Windows XP.You can use this built-in feature to create a data CD/DVD or an audio CD. The steps below will guide you through the procedures. Although the steps below are based on Windows 7, they are very much similar to Windows Vista.If you're using a Re-Writable CD (CD-RW) or DVD (DVD-RW, DVD+RW), make sure the disc is blank (or "formatted"). You might need to erase (or "format") it before using. For information how to erase a rewritable CD/DVD on Windows Vista or Windows 7 without using a third-party software.


1.Insert a blank recordable/rewritable CD (CD-R) or DVD (DVD-R/RW, DVD+R/RW) disc into the CD burner drive.

2. With a new blank disc, Windows might pop up a prompt asking you which format you want to use (as shown on the image below).As explained on the popup, the option "Like a USB Flash Drive" is more convenient if you want to use the disc as an external storage, which you can add or delete (rewritable disc) files on the fly; however, once the disc is formatted with this option, it can only be read on computers with Windows XP or later. On the other hand, the option "With a CD/DVD Player" is the traditional format of CD/DVD disc and is compatible with a wider range of Windows versions as well as other devices, but requires to burn the disc (or erase the entire disc) all at once.


3.  To keep it simple, we will follow the steps to create traditional CD/DVD, so select "With a CD/DVD Player". Don't forget to change the "Disc title" to something descriptive for your disc, then click "Next".4.   Navigate to the folders or files which you want to burn to the disc, then select (highlight) the folders/files and click "Burn" (located above the file browsing panels)


5.    A new window is now created similar to the following image, showing the selected files and folders added to the queue to burn to disc. Click "Burn to disc".

  
6.   On the next popup "Burn to Disc", verify the disc title and select the maximum burning speed, then click next.


 7.  If you have selected audio files (i.e. MP3), you will be asked to burn the disc as data or audio as shown in the following image. 


8. The burning wizard will start writing data to the disc and will close and eject the CD/DVD when finish.


How To Access a Blocked Website with UltraSurf


UltraReach, the company that created the UltraSurf software, is a group in Silicon Valley “dedicated to providing technologies and service for people to exchange information on Internet freely and safely.” UltraReach invented a platform used in conjunction with UltraSurf called the GIFT system, “which offers guaranteed connection and reconnection service to users inside these censor countries and capability of serving very large number of users with affordable resource.”


UltraSurf is a free software which enables users inside countries with internet censorship to visit public websites that may be blocked freely and safely. The software also protects your privacy by hiding your IP address and clearing your web browsing history after you close the program. You do not need to download any software to use UltraSurf.


Step 1. 

Point your browser to http://www.ultrareach.com/ and download the latest version of UltraSurf. Either download the software from the main landing page by clicking the large “Free Download” button, or click on the downloads tab to be directed to a new page with the file to download.
Save the file to your computer. The files saves as a compressed or zip file.

Step 2.

Close your browser. You will then need to unzip the file.

Step 3. 

You do not need to install any software. UltraSurf is an executable file. Unlike a data file, it is a type of file that causes a computer to run a program.
Double-click on the UltraSurf executable file to start the program, and click the “Run” button in the pop-up window.

Step 4. 

The user interface and a browser will pop up. On the user interface, you will see boxes under “Preferred.” You can check any of the boxes to connect to the server. If you have a problem, you can check one of the boxes to re-connect.

Step 5. 

You can configure your settings by clicking on the “Options” tab. For example, if you don’t want UltraSurf to start Internet Explorer automatically when you run the program, uncheck the box next to that option.

Step 6. 

Ready to surf? Use the browser that popped-up when you began running the program. This is the secure browser. You will see a gold lock icon in the corner of your screen to indicate that UltraSurf is running. Note: If you want to hide this lock icon so others can’t see that you are using UltraSurf, click on the Options tab on the user interface and check the box next to “Hide Golden Lock.”
Enter the URL for any blocked website into the regular field on the browser and you should be able to access it.

Step 7. 

Want to use UltraSurf on another computer? Just copy the file from your computer and save it to your USB drive. Now you can use it wherever you go!

How to fix “this copy of windows is not genuine” notification in windows 7

Do you want to disable "this copy of windows is not genuine message" in windows seven? Try this method. It requires no additional software and hardly takes 4~8 minutes. People who are using windows seven whose license period has expired knows very well how disgusting that pop-up of windows is. I mean com'on do we really need to remind every five minutes about the windows that we are using is not genuine?? Additionally, we get banished from setting the desktop wallpaper. "Desktop Wallpaper" guys!! It is kind of stealing the beauty of laptop. And its a big deal!!
 

               You might be searching for the software that can hide “Windows Seven not genuine” notification. Well, did you get success? If your answer is no, here are some easy steps that will allow you to do so without using any software. A lot of promising software are available now a days to fix this but unfortunately none of them works correctly. I'm posting a method that you can do it by yourself and hardly takes 4-8 minutes. Here we go...

Procedure to fix "this copy of windows is not genuine" notification:

The whole process can be divided into two parts:
PART A - Uninstalling Windows Update: KB971033
PART B - Rearm Windows

                The so notification is because of Windows Update: KB971033. You need to uninstall it. It will not affect anything else in your system. Follow these simple steps to uninstall it-


PART - A: Uninstalling Windows Update: KB971033

  1. Go to Windows Update
  2. Hit Installed Updates (link at the bottom left corner). If that link isn’t there, hit “view update history” and hit the “installed updates” link at the top.
  3. Scroll down to the section titled “Microsoft Windows” and look for update KB971033.
  4. Right click it and hit “uninstall”. Hit okay.

  1. Reboot
PART - B: Rearm Windows:
  1. Click start and simply type COMMAND PR in the start menu’s search box. Right click COMMAND PROMPT and select RUN AS ADMINISTRATOR.


 2.   In the command prompt window type:

slmgr.vbs -rearm
           and press enter. (Note that there is a space between slmgr.vbs and -rearm.)
 3.  Now reboot and you're good to go.

Be sure to turn off windows update or else you will face the same problem again. Alternatively, you can hide Windows Update: KB971033 in your windows update history.

This method is tested by me and a lot of other people
and it is working fine.
If you got stuck anywhere refer to comments.


Create a robots.txt file

The robots.txt file is used to instruct search engine robots about what pages on your website should be crawled and consequently indexed. Most websites have files and folders that are not relevant for search engines (like images or admin files) therefore creating a robots.txt file can actually improve your website indexation.


A robots.txt is a simple text file that can be created with Notepad. If you are using WordPress a sample robots.txt file would be:
User-agent: *
Disallow: /wp-
Disallow: /feed/
Disallow: /trackback/
“User-agent: *” means that all the search bots (from Google, Yahoo, MSN and so on) should use those instructions to crawl your website. Unless your website is complex you will not need to set different instructions for different spiders.
“Disallow: /wp-” will make sure that the search engines will not crawl the WordPress files. This line will exclude all files and foldes starting with “wp-” from the indexation, avoiding duplicated content and admin files.
If you are not using WordPress just substitute the Disallow lines with files or folders on your website that should not be crawled, for instance:
User-agent: *
Disallow: /images/
Disallow: /cgi-bin/
Disallow: /any other folder to be excluded/
After you created the robots.txt file just upload it to your root directory and you are done!

How to show profile picture of friends as emotion in Facebook chat


Today I'm going to share the trick by which you can show profile picture of friends as emotion in Facebook chat. I'm sure you will be loving it.......

How to do this trick

It’s simple just while chatting with your friends enter

[[your friend's id]]

Now how to find your friend’s id

Visit your friend’s profile then you will see like this


Now in this case friends’s id will be 100003298748858 so you have to enter [[100003298748858]] in chat. Or else if you see like this.


then in this case you have to enter [[sumanacharya]] while chatting.
Now enjoy showing your friends profile picture as emotions in Facebook.