How To Access a Blocked Website with UltraSurf


UltraReach, the company that created the UltraSurf software, is a group in Silicon Valley “dedicated to providing technologies and service for people to exchange information on Internet freely and safely.” UltraReach invented a platform used in conjunction with UltraSurf called the GIFT system, “which offers guaranteed connection and reconnection service to users inside these censor countries and capability of serving very large number of users with affordable resource.”


UltraSurf is a free software which enables users inside countries with internet censorship to visit public websites that may be blocked freely and safely. The software also protects your privacy by hiding your IP address and clearing your web browsing history after you close the program. You do not need to download any software to use UltraSurf.


Step 1. 

Point your browser to http://www.ultrareach.com/ and download the latest version of UltraSurf. Either download the software from the main landing page by clicking the large “Free Download” button, or click on the downloads tab to be directed to a new page with the file to download.
Save the file to your computer. The files saves as a compressed or zip file.

Step 2.

Close your browser. You will then need to unzip the file.

Step 3. 

You do not need to install any software. UltraSurf is an executable file. Unlike a data file, it is a type of file that causes a computer to run a program.
Double-click on the UltraSurf executable file to start the program, and click the “Run” button in the pop-up window.

Step 4. 

The user interface and a browser will pop up. On the user interface, you will see boxes under “Preferred.” You can check any of the boxes to connect to the server. If you have a problem, you can check one of the boxes to re-connect.

Step 5. 

You can configure your settings by clicking on the “Options” tab. For example, if you don’t want UltraSurf to start Internet Explorer automatically when you run the program, uncheck the box next to that option.

Step 6. 

Ready to surf? Use the browser that popped-up when you began running the program. This is the secure browser. You will see a gold lock icon in the corner of your screen to indicate that UltraSurf is running. Note: If you want to hide this lock icon so others can’t see that you are using UltraSurf, click on the Options tab on the user interface and check the box next to “Hide Golden Lock.”
Enter the URL for any blocked website into the regular field on the browser and you should be able to access it.

Step 7. 

Want to use UltraSurf on another computer? Just copy the file from your computer and save it to your USB drive. Now you can use it wherever you go!

How to fix “this copy of windows is not genuine” notification in windows 7

Do you want to disable "this copy of windows is not genuine message" in windows seven? Try this method. It requires no additional software and hardly takes 4~8 minutes. People who are using windows seven whose license period has expired knows very well how disgusting that pop-up of windows is. I mean com'on do we really need to remind every five minutes about the windows that we are using is not genuine?? Additionally, we get banished from setting the desktop wallpaper. "Desktop Wallpaper" guys!! It is kind of stealing the beauty of laptop. And its a big deal!!
 

               You might be searching for the software that can hide “Windows Seven not genuine” notification. Well, did you get success? If your answer is no, here are some easy steps that will allow you to do so without using any software. A lot of promising software are available now a days to fix this but unfortunately none of them works correctly. I'm posting a method that you can do it by yourself and hardly takes 4-8 minutes. Here we go...

Procedure to fix "this copy of windows is not genuine" notification:

The whole process can be divided into two parts:
PART A - Uninstalling Windows Update: KB971033
PART B - Rearm Windows

                The so notification is because of Windows Update: KB971033. You need to uninstall it. It will not affect anything else in your system. Follow these simple steps to uninstall it-


PART - A: Uninstalling Windows Update: KB971033

  1. Go to Windows Update
  2. Hit Installed Updates (link at the bottom left corner). If that link isn’t there, hit “view update history” and hit the “installed updates” link at the top.
  3. Scroll down to the section titled “Microsoft Windows” and look for update KB971033.
  4. Right click it and hit “uninstall”. Hit okay.

  1. Reboot
PART - B: Rearm Windows:
  1. Click start and simply type COMMAND PR in the start menu’s search box. Right click COMMAND PROMPT and select RUN AS ADMINISTRATOR.


 2.   In the command prompt window type:

slmgr.vbs -rearm
           and press enter. (Note that there is a space between slmgr.vbs and -rearm.)
 3.  Now reboot and you're good to go.

Be sure to turn off windows update or else you will face the same problem again. Alternatively, you can hide Windows Update: KB971033 in your windows update history.

This method is tested by me and a lot of other people
and it is working fine.
If you got stuck anywhere refer to comments.


Create a robots.txt file

The robots.txt file is used to instruct search engine robots about what pages on your website should be crawled and consequently indexed. Most websites have files and folders that are not relevant for search engines (like images or admin files) therefore creating a robots.txt file can actually improve your website indexation.


A robots.txt is a simple text file that can be created with Notepad. If you are using WordPress a sample robots.txt file would be:
User-agent: *
Disallow: /wp-
Disallow: /feed/
Disallow: /trackback/
“User-agent: *” means that all the search bots (from Google, Yahoo, MSN and so on) should use those instructions to crawl your website. Unless your website is complex you will not need to set different instructions for different spiders.
“Disallow: /wp-” will make sure that the search engines will not crawl the WordPress files. This line will exclude all files and foldes starting with “wp-” from the indexation, avoiding duplicated content and admin files.
If you are not using WordPress just substitute the Disallow lines with files or folders on your website that should not be crawled, for instance:
User-agent: *
Disallow: /images/
Disallow: /cgi-bin/
Disallow: /any other folder to be excluded/
After you created the robots.txt file just upload it to your root directory and you are done!

How to show profile picture of friends as emotion in Facebook chat


Today I'm going to share the trick by which you can show profile picture of friends as emotion in Facebook chat. I'm sure you will be loving it.......

How to do this trick

It’s simple just while chatting with your friends enter

[[your friend's id]]

Now how to find your friend’s id

Visit your friend’s profile then you will see like this


Now in this case friends’s id will be 100003298748858 so you have to enter [[100003298748858]] in chat. Or else if you see like this.


then in this case you have to enter [[sumanacharya]] while chatting.
Now enjoy showing your friends profile picture as emotions in Facebook.

Add A Photo To My Computer Properties

I am going to share a simple tip by which you can add a photo and your name to my computer properties.

First of all open notepad and type the following
[General]
Manufacturer=Your Name Here
[Support Information]
Line1=Your Name Here
Line2=Your Address Here
Line3=Your Email Address Here
Save as OEMINFO.INI in the C:\WINDOWS\system32 folder.

Then create a .bmp photo and save it the System32 folder as oemlogo.bmp
..........................
The size of the image should be 180 x120 pixels.
Make a right click on my computer, Properties and you’ll see the changes.
It looks like this:

How to Disable Data Copy To USB Flashdisk / USB External Disk

If your laptop or computer is often used by others, while a lot of important data in it, o f course you  do not want your data copied by them without permission
To make disable copy to USB external drive or flashdisk, one way is with  making change setting in regedit editor

The steps are :

• Press Win + R (to go to Run Command )
• Type Regedit, and then click OK (Will appear Windows Registry Editor )


In the Registry Editor window
• Double click  HKEY_LOCAL_MACHINE
• Double click  SYSTEM
• Double-click  CurrentControlSet


• Right-click on Control, => click New => click Key.   
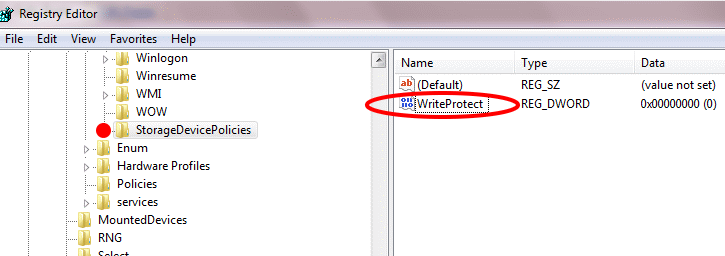
Give the name : StorageDevicePolicies

• Right-click on StorageDevicePolicies (just created), => Click New => Choose  DWORD (32-bit) Value => give a name : WriteProtect

• Double click WriteProtect (just created), => Change the Value data from 0 to  1 => click OK


• Log off and logon again the computer to see the result, try copying file to flashdisk. copying will disallowed.

• To return to the Normal condition, change the Value data  to 0, or delete key and the Dword that we have created, by right click => click delete.


Factors to determine a Blog Name

Today I'm going to share some tips about how a blog name should be.


1) It must describe your blog: it is probable that lots of people will see a link to your blog before having the chance to actually read it (in search engines, for instance). Guess what, if just by looking at the name they can figure what the blog is about they will be more likely to visit it.
2) It must be easy to remember: suppose your blog talks about cycling, fitness and health advice in general. Naming it “The Cycling, Fitness and General Health Advice Blog” would offer quite an exhaustive description of the blog, but would it also be easy to remember? Stick with simple names.
3) It must be equal to the domain name: this rule is often ignored by people, probably because finding a suitable domain that has not been registered yet is a difficult task. Still if your domain name does not match the blog name you will probably lose some readers along the way. When people visit your blog through a link they will just read the name of the blog. Should they decide to revisit the site a couple of days later they will just type that name followed by a dot com. If they do not find your blog once they hit enter they will just go somewhere else.